Automatic security checks (Pre-Arm checklist)
Step 1 of the mission launch or resumption reminds you of the positioning of the solution (EYESEE Drone and EYESEE Tags) and indicates the name of the first location of the mission in front of which the EYESEE Drone should be placed, approximately 1 metre away from the pallets.
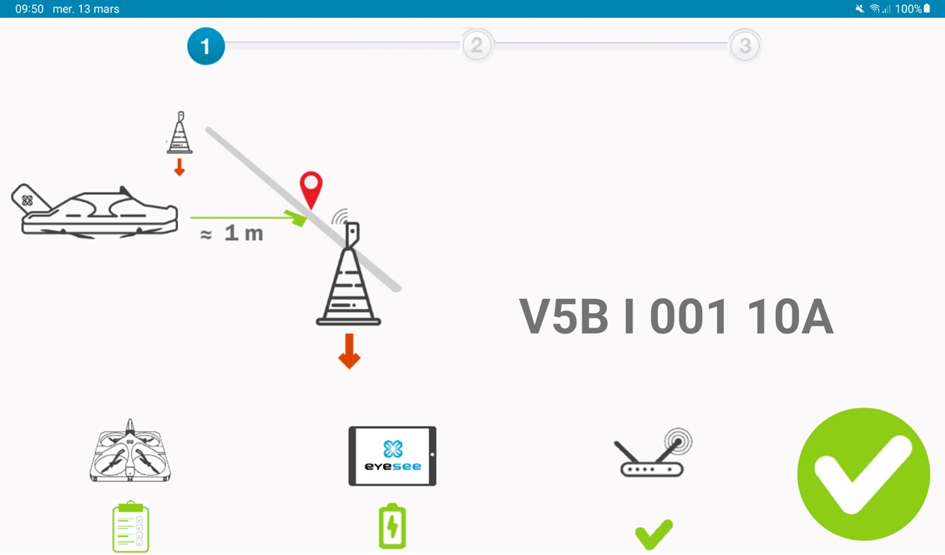
The lower part of the screen shows :
- The status of the checks prior to arming the engines (Pre-Arm checklist), allowing the EYESEE Drone to take off safely;
- The charging status of the tablet batteries;
- The status of the EYESEE Drone’s connection to the router’s Wi-Fi network.
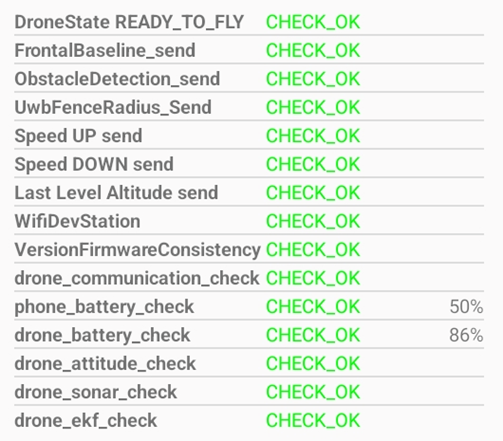
To view the details of the EYESEE Drone Pre-Arm checklist, click on the Drone icon at the bottom left of the screen.
When the solution is operating normally, all the items in the checklist are marked “CHECK_OK“:
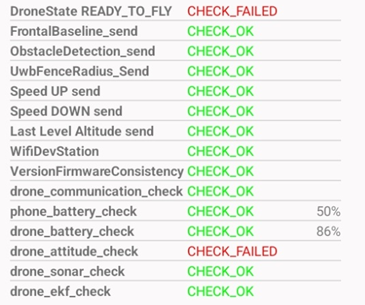
If one or more checklist items cannot be validated, the items in question will be marked “CHECK_FAILED“.
Pre-Arm checklist: explanation and resolution
✔️Drone State READY_TO_FLY
EYESEE Drone must be restarted after each flight. If EYESEE Drone is not restarted, the check will fail and the CHECK_FAILED message will be displayed.
If the check fails even though EYESEE Drone has been restarted, try returning to the application’s main screen before restarting your mission.
✔️Frontal Baseline_Send
Checks that flight parameters have been correctly sent.
If the check fails, make sure that the Wi-Fi connection is of good quality. Make sure that there are no sources of interference between the EYESEE Drone and the Wi-Fi router. Then return to the application’s main screen and restart the mission.
If the issue persists, restart EYESEE Drone.
If the problem persists after restarting EYESEE Drone, please contact the EYESEE support service at help@eyesee-drone.com.
✔️Obstacle Detection_send
Checks that flight parameters have been correctly sent.
If the check fails, make sure that the Wi-Fi connection is of good quality. Make sure that there are no sources of interference between the EYESEE Drone and the Wi-Fi router. Then return to the application’s main screen and restart the mission.
If the issue persists, restart EYESEE Drone.
If the problem persists after restarting EYESEE Drone, please contact the EYESEE support service at help@eyesee-drone.com.
✔️Uwb Fence Radius_Send
Checks that flight parameters have been correctly sent.
If the check fails, make sure that the Wi-Fi connection is of good quality. Make sure that there are no sources of interference between the EYESEE Drone and the Wi-Fi router. Then return to the application’s main screen and restart the mission.
If the issue persists, restart EYESEE Drone.
If the problem persists after restarting EYESEE Drone, please contact the EYESEE support service at help@eyesee-drone.com.
✔️Speed UP send
Checks that flight parameters have been correctly sent.
If the check fails, make sure that the Wi-Fi connection is of good quality. Make sure that there are no sources of interference between the EYESEE Drone and the Wi-Fi router. Then return to the application’s main screen and restart the mission.
If the issue persists, restart EYESEE Drone.
If the problem persists after restarting EYESEE Drone, please contact the EYESEE support service at help@eyesee-drone.com.
✔️Speed Down send
Checks that flight parameters have been correctly sent.
If the check fails, make sure that the Wi-Fi connection is of good quality. Make sure that there are no sources of interference between the EYESEE Drone and the Wi-Fi router. Then return to the application’s main screen and restart the mission.
If the issue persists, restart EYESEE Drone.
If the problem persists after restarting EYESEE Drone, please contact the EYESEE support service at help@eyesee-drone.com.
✔️Last level altitude send
Checks that flight parameters have been correctly sent.
If the check fails, make sure that the Wi-Fi connection is of good quality. Make sure that there are no sources of interference between the EYESEE Drone and the Wi-Fi router. Then return to the application’s main screen and restart the mission.
If the issue persists, restart EYESEE Drone.
If the problem persists after restarting EYESEE Drone, please contact the EYESEE support service at help@eyesee-drone.com.
✔️Wifi dev station
Checks that flight parameters have been correctly sent.
If the check fails, make sure that the Wi-Fi connection is of good quality. Make sure that there are no sources of interference between the EYESEE Drone and the Wi-Fi router. Then return to the application’s main screen and restart the mission.
If the issue persists, restart EYESEE Drone.
If the problem persists after restarting EYESEE Drone, please contact the EYESEE support service at help@eyesee-drone.com.
✔️Version Firmware Consistency
If the version of your autopilot is out of date, the message CHECK_FAILED is displayed.
To update your version of the autopilot, go to EYESEE App > Drones > Update packages.
✔️Drone_Communication_check
Check that EYESEE Drone is communicating with the tablet.
If the check fails, make sure that the Wi-Fi connection is of good quality. Make sure that there are no sources of interference between the EYESEE Drone and the Wi-Fi router. Then return to the application’s main screen and restart the mission.
If the issue persists, restart EYESEE Drone.
If the problem persists after restarting EYESEE Drone, please contact the EYESEE support service at help@eyesee-drone.com.
✔️Phone_battery check
Checks whether the tablet’s battery has enough charge to carry out the mission.
✔️Drone battery check
Check that the EYESEE Drone’s battery is sufficiently charged to carry out the mission.
If the battery level is insufficient, replace the discharged battery with a charged one.
✔️Drone attitude check
To take off correctly, EYESEE Drone must be correctly positioned on the ground and flat.
If this check fails (CHECK_FAILED), restart EYESEE Drone and do not handle it during the start-up phase.
If the problem persists after restarting EYESEE Drone, please contact the EYESEE support service at help@eyesee-drone.com.
✔️Drone sonar check
Check that the EYESEE Drone’s sonars are returning normal values.
This check fails (CHECK_FAILED) when one of the sonars returns an abnormal value. In this case, check that the sonars are not obstructed. If necessary, blow on the six sonars to remove any dust.
✔️Drone ekf check
Checks that the EYESEE Drone position has been initialised.
If this check fails (CHECK_FAILED), restart EYESEE Drone and do not handle it during the start-up phase.
If the problem persists after restarting EYESEE Drone, please contact the EYESEE support service at help@eyesee-drone.com.